Sunday, February 27, 2022

First Free Embroidery of the Year-


YAY!!! I finally got one finished and here it is ------ Let's just say this is January's free embroidery even though it's February.

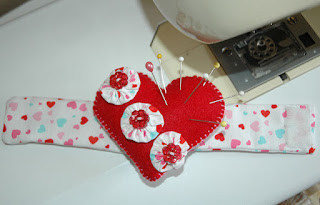
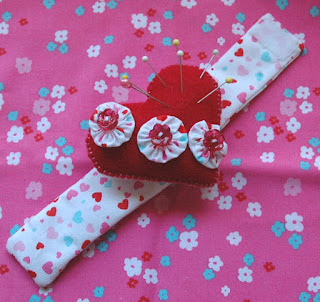
I know I'm really late but if you've read my past posts you know why but no matter because I'm finally ready to post the first embroidery freebie of the year. BTW, I hope you enjoyed the wrist pincushion pattern I posted at the beginning of the month.
I thought I'd go back to giving you some directions for the embroideries. You will need to know basic stitches and there are a LOT of youtube videos that can teach you any you don't.

1. Cut a square of your background fabric 4 1/4" x 4 1/4". If you aren't adding borders like I did you should cut the fabric larger so it will fit in your embroidery hoop.

2. Using a permant marker like a Pigma pen, trace the design.

3. Add the borders following these directions. Note that you will add these borders to all 12 of the designs. I plan on using a variety of matching fabrics, though I may end up changing this multi floral fabric for another. This is the way I'm adding fabric borders to all my embroidered squares this year. Use your fav quilt border if you don't want to use this one.

I cut the border strips from quilters quarters/fat quarters. I wanted the finished borders to be 1" wide so I added 1/2" for the seam allowances. I didn't cut the border into pieces, instead I sewed it to the square then cut it. Follow these directions and diagrams to make them like I do.
NOTE:I add the borders before I embroider but after I trace the design!

-- Cut a piece of fabric 1 1/2" wide. Match the edge to the TOP of the square and sew across.

Cut off the excess and press open.

-- Repeat for one of the sides. I go clock-wise.

-- Repeat for the bottom.

--Finish with the remaining side.
Make sure to press it and then check to make sure the borders are all even.

4. The petals can be appliqued like I did or just stitched with your favorite embroidery stitch.
-Trace 8 petals on Heat n Bond by Therm-o-web. This is a product that makes appliqueing small pieces so much easier. TIP: Don't hold the iron on for just a few seconds or you will also melt the other side.
-Once it cools peel off the paper.
-Lay the fabric petals over the tracings and iron in place.
-Do a small blanket stitch with 2 strands of floss ( I used DMC 603) around each petal.
-With 4 strands of the same floss do a chain stitch around the inner circle.
- For the "peeking" petals do a stem stitch and a long straight stitch with 3 strands of the same floss.

5. For the flower center use 3 strands of floss (I used DMC 727) to do a stem stitch next to the chain stitch.
- Fill in the circle with as many french knots as you like. I used 6 strands to make 2 wrap french knots.
- Repeat the knots at the tip of each long straight stitch in the small flower petals.

6. The outside line of the leaves is stem stitched with 3 strands of floss (I used DMC 703).
- The dots can be beads or 3 wrap french knots with the same floss.

7. The small series of lines in the corners are back stitched using 3 strands of the same flosses used for the flower.

8. The dots can be beads or french knots. I didn't do them yet since I plan on adding beads. I will probably add beads on the flower, too.

Here's the pattern for the embroidery:

 Right click the pattern to save it to your hard drive. You'll need to print a pattern for tracing.

 
©Billie Jo Heisler 2022
All rights reserved

 Disclaimer:
I drew this design by hand then used a software program to edit it.
Please consider the drawing copyrighted. You have my permission to print copies of the drawing in any size for your own use but not to share or sell. If you want to share the pattern please link to the blog pages.
The embroidery design is my own. I have not knowingly copied anyone else's work.
 

Wednesday, February 23, 2022

Yay! It's not covid

 My test came back negative!!!! Now it looks like I've been sick with a sinus infection. I can believe it since my allergies have been SO bad. I hate to take meds but it really looks like I'm going to have to try some different kinds till I find one that works best.

I'm looking forward to another free art summit (march 2 - 14). Here's the link: 2022-loving-healing-creating-summit  Oh, and Ida Andersen Lang  is having a free class starting on the 28th. I've signed up for both so I'm hoping that I'll feel good enough to take them. I haven't taken much time to make any art since I'm trying to embroider this year's freebies so I'm really looking forward to the classes. This year I decided to design all 12 freebies so I can get them made right away instead of doing one a month. I'm going shopping tomorrow to look for fabric to border the squares.

I need to start posting pics of my work. In fact I need to start taking photos again. Just another thing I got out of the habit of.

oh no, I lost track of time. I wanted to post on 2-22-22 or 22-2-22 if you say it that way. Hope you had  a great day and the flu has stayed away for you and yours.

Friday, February 18, 2022

Too sick to stitch

 Yeah, I know, I bitched last year about wearing masks to avoid covid along with getting all your shots (which I did) and what did I do? I went in my local library and didn't pull up my mask. Three days later I came down with covid, well at least that's what I think I have. My DH took me to CVS yesterday to get tested, so now we wait. So far, fingers crossed, he won't get it. It's definitely not so bad I need to go to the hospital but I am soooooo tired. I'm sure some of what I'm dealing with is my regular allergy crap. So be careful out there cause you never know where that germ is lurking.

I have so much embroidery to do but just can't wrap my brain around any of it. I have been crocheting some boot cuffs but even that isn't going well. I have to use a lot of safety pin to mark the stitches because I keep making mistakes. I have 2 new doll patterns for spring started but again I just can't get past sitting and looking at my supplies.

So it looks like the schedule I set up for myself at the end of the year has gone down the drain for now.  By the time I feel well enough to work again I'll be behind as usual :(

I'm off to curl up with a blanket, a hot cup of tea, and my cat. Will post again soon.

Wednesday, February 9, 2022

Free Pincushion Pattern


 I guess you were expecting a free embroidery pattern, but though I have all 12 designs drawn and traced I haven't started stitching yet.

I needed a wrist pincushion so I turned it into a pattern to share. I know there are other versions of this style but here's mine.

Material List -

For the band you may need longer or shorter pieces to fit your wrist- You can substitute wide ribbon for the band (so much easier)
9" x 7" piece of cotton fabric and of thin batting or interfacing
4" x 4 1/2" pieces of red felt and white felt
matching sewing thread
3 fun buttons
embroidery floss or pearl cotton
1" x 1/2" piece of velcro or other closure
small amount of polyester filling or wool roving

1. Cut out the 2 hearts from the felt.
2. Lay one felt heart on top of the other. Use all 6 strands of floss to sew the hearts together using a blanket stitch or running stitch. Make sure to leave an opening for stuffing.
3. Stuff the heart firmly. Continue stitching the opening closed.
4. Cut 3 circles from cotton fabric.
5. Sew a gathering stitch close to the edge and pull tightly to make a yo-yo. Shape and flatten it. Repeat for the other 2 circles.
6. Follow the picture for where I placed the yo-yos or put them where you want. Sew them in place and add a button to each center.
7. Now make the wrist band. My band is 8 1/2" but you may need it longer or shorter. I wanted it to go over shirt and sweater sleeves. Measure your wrist and add about 2" and 1/2" for the seam allowances.
8. Fold the fabric in half and lay the strip of batting on top. Sew leaving an opening for turning.
9. Turn right side out. Press and sew opening closed.
10. Sew the velcro to the ends. Make sure one piece is on the top and one on the bottom. Option: add a fun button the top end.
11. Fold the band in half to find the center. Pin the heart pincushion there and hand sew in place.

All done!

Here's a heart pattern to use but you can cut one any size you want.


Life's been busy and I'm really working on my habit of procrastination. Have you heard about choosing a word for the year? The various art groups I follow do this so I thought I'd choose procrastination but I now see it should be focus since this is what I need to do to stop all the putting off things.

I did really well last month. That's when I made the pincushion. In fact I started designing more of them with the intent to do a year of free ones but changed my mind after I got the ideas for some embroidery. I'll be starting one in a few days. Right now I dealing with some really bad allergies and mostly resting. Look for one to be listed by the end of the month.