Now the new puppy. He's 9 weeks old and is an English cocker spaniel like Micah but black with a white spot on his chest. The DH named him Tinker. It's a name he's been wanting to use since Dillon. I wanted to call him Cory because he's colored like our first cocker that was named Cory and I like that name. The DH didn't want to 're-use' a name so he finally got his Tinker who we all know will be called Tinker Bell. More about him later since I really need to get moving on posting this freebie while I can get some time.
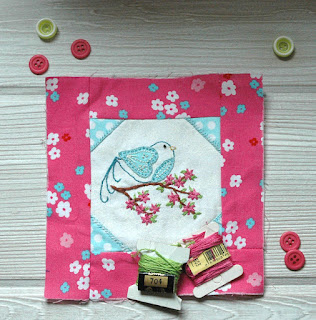
Here's my favorite embroidery so far. I hope you'll like it, too. Oh, by the way, since May is my birthday month all the pdfs of my patterns are on sale at my Etsy store. They will be 20 % off all month long.
If you want to do the other free embroidery design you'll find one for each month. Check passed posts.
Here are the directions for May's freebie.
1. Cut a square of your background fabric 4 1/4" x 4 1/4". If you aren't adding borders like I did you should cut the fabric larger so it will fit in your embroidery hoop.
2. Using a permanent fine tip marker like a Pigma pen, trace the design.
3. Pin the triangle pieces of fabric to the white background fabric following pattern for placement. I used my favorite Heat n Bond by Therm-o-web to attach the triangles. Then I did a blanket stitch with 3 strands of floss (I used DMC 598).
4. Add the borders following the directions in the freebie posted in February.
5. Cut out the heart wing and the bird's chest piece. Again I used Heat n Bond by Therm-o-web to attach them. Do a blanket stitch around them with 2 strands of floss (DMC 598).
- Next comes a running stitch just inside the blanket stitch using 3 strands of floss (DMC 3810).
-Use 3 strands of floss (DMC white) to backstitch next to the running stitch on the chest and heart.
- Use the same thread to make a long straight stitch and 3 french knots in both halves of the heart.
- Stem stitch the tail using 2 strands of floss (DMC 3810).
-Use the same thread to back stitch the bird's body.
- The beak is back stitch using 2 strands of floss (DMC 725).
- The eye is made with 4 strands of black floss to make a french knot.
6. The branch is couched. I used 12 strands of floss for the thick area and 6 for the thinner branches. I used 3 strands for the couching stitches (DMC 632).
7. The flowers are lazy daisy stitches made with 3 strands of floss (DMC 603).
- Leaves are also lazy daisy (DMC 704). Follow the pattern for where to make them or add as many flowers and leaves as you want.
- The center are french knots or beads. I'm going to use beads. They will be added after sewing the quilt together.
Right click the pattern to save it to your hard drive. You'll need to print a pattern for tracing and one for cutting out the triangles, chest piece, and the heart.
©Billie Jo Heisler 2022
All rights reserved
Disclaimer: I drew this design by hand then used a software program to edit it.
Please consider the drawing copyrighted. You have my permission to print copies of the drawing in any size for your own use but not to share or sell. If you want to share the pattern please link to the blog pages.
The embroidery design is my own. I have not knowingly copied anyone else's work.


