Wow!, I don't know about you but I'm SOOOOO glad to see the end of this year. It's been another bad one for us with one thing breaking after another. I'm still deciding whether to do a monthly series next year or not. I have the designs drawn but finding time is as always stressful. I do have all 12 of this years designs sewn together and basted with batting and backing. Just have to make time for some quilting. I'm wasting too much time with games instead of working. It's my way of dealing with stress. Oh, and eating too much. Hope you liked this year's free patterns!
If you want to do other free embroidery designs you'll find one for each month.
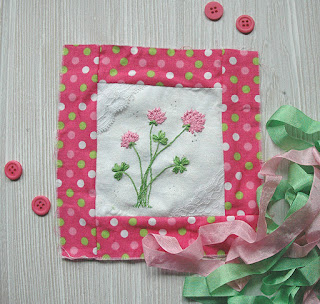
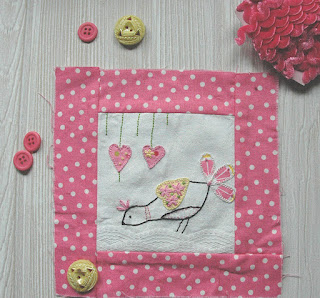
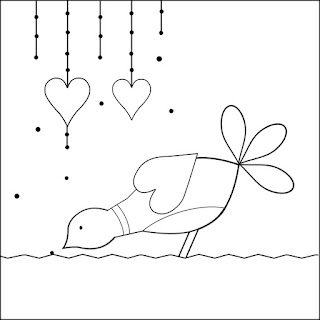
Here are the directions for December's freebie.
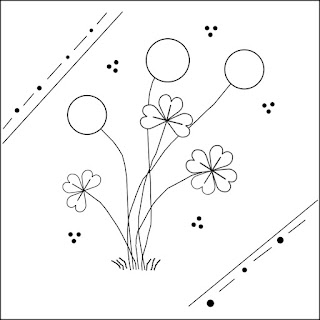
1. Cut a square of your background fabric 4 1/4" x 4 1/4". If you aren't adding borders like I did you should cut the fabric larger so it will fit in your embroidery hoop.
2. Using a permanent fine tip marker like a Pigma pen, trace the designs. You can also skip the grass lines and just stitch them where you want them. The leaves can be marked with a dot at the tip and at the stem.
3. Add the lace and ribbon across the bottom. I just basted them in place. You can sew the pieces down however you like. I'm going to add beads instead of just sewing the fabric in place so I'm leaving the basting stitches until then.
4. Add the borders following the directions in the freebie posted in February. The borders cover the bottom of the lace. If you don't want this either use narrow lace or add it after you add the borders.
5. Next is the appliqued bird. You can embroider it if you don't want to deal with small pieces of fabric. I used my favorite Heat n Bond by Therm-o-web to attach the pieces. Then I did a blanket stitch with 2 strands of floss (I used DMC 603).
6. Do a running stitch with 2 strands of floss on the heart wing and chest. (I used DMC 598).
7. Outline the wings with 3 strands of floss using a stem stitch. (I used DMC 597).
8. The body is done with 4 strands of floss to do a backstitch.(I used DMC 603). Use 3 strands to weave in and out of the back stitches. (I used DMC 601).
9. The eye is a 2 wrap French knot using 3 strands. (I used DMC 310).
10. The tail is made with 2 strands of floss to do the chain stitches. (I used DMC 601 and 598).
11. The nest is made with 3 strands of floss to make straight stitches. (I used DMC 725). The dots can be french knots or beads.
12. The dangles in the corner are couched. I used 3 strands of DMC 725 for the lines, 2 strands of DMC 601 for the X's, and 3 strands of DMC 597 for the French knots. Use beads if you prefer.
Right click the pattern to save it to your hard drive.

©Billie Jo Heisler 2022
All rights reserved
Disclaimer:
I drew this design by hand then used a software program to edit it.
Please consider the drawing copyrighted. You have my permission to print copies of the drawing in any size for your own use but not to share or sell. If you want to share the pattern please link to the blog pages.
The embroidery design is my own. I have not knowingly copied anyone else's work.


_poster.png)