Friday, April 1, 2022

The free embroidery for April


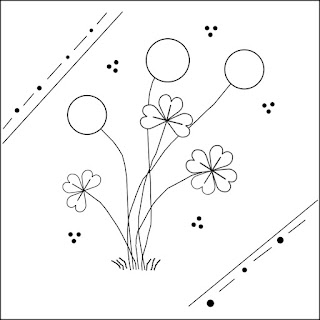
Yay!!! I'm finally on schedule so this is April's embroidery. I really like how I used ribbon on this embroidery but you can always switch it out for other trims or even embroidery stitches.

Something I didn't include in the first free embroidery was that I'm using a white leaf pattern on white cotton fabric. I found that it's not the easiest fabric to trace a pattern on. I talk more about it on last month's freebie post.

Here are the directions for April's freebie. 

1. Cut a square of your background fabric 4 1/4" x 4 1/4". If you aren't adding borders like I did you should cut the fabric larger so it will fit in your embroidery hoop.

2. Using a permanent fine tip marker like a Micron Pigma pen, trace the design.

3. Baste pieces of ribbon to the fabric following pattern for placement. I used 1/4" and 1/8 inch wide ribbon. I do the embroidery later.

4. Add the borders following the directions in the freebie posted in February.

5. Starting with the ribbon make the cross stitches with all 6 strands of floss (I used DMC 597).
-I'm going to use beads where you see the tiny dots. They will be added after sewing the quilt together. You can use french knots instead.

6. Next do the centers of the flowers. Stem stitch around the oval lines using 3 strands of floss (I used DMC 725).
- In the center of the oval make 3 small cross stitches, side-by-side using the same floss. You can substitute french knots or beads.

7. The petals are back stitched with 3 strands of floss (I used DMC 601).
- The lines are along straight stitch using 3 strands of floss (I used DMC 603).

8. The stems are couched with 6 strands of floss )I used DMC 704) for the base and 3 for the couching. Couch at each spot where you will be adding leaves. At the bottom where there are no leaves continue spacing the couching as if you were still making them.
- The leaves are made with lazy daisy stitches using the same thread. Follow the pattern and your couching places for where to make them.

9. Next I did the grass. I used 3 strands of floss to do straight stitches (I used DMC 703). Make as much grass as you want. For this embroidery I used short straight stitches but last month I made the grass going up. You can always substitute them.

Note: All the dots can be beads or french knots. I didn't do them yet since I plan on adding beads. I'll also be adding beads and french knots on the ribbon.

Right click the pattern to save it to your hard drive. You'll need to print a pattern for tracing.


©Billie Jo Heisler 2022

All rights reserved


 Disclaimer:

I drew this design by hand then used a software program to edit it.

Please consider the drawing copyrighted. You have my permission to print copies of the drawing in any size for your own use but not to share or sell. If you want to share the pattern please link to the blog pages.

The embroidery design is my own. I have not knowingly copied anyone else's work.

Thursday, March 17, 2022

Here's free embroidery number 3


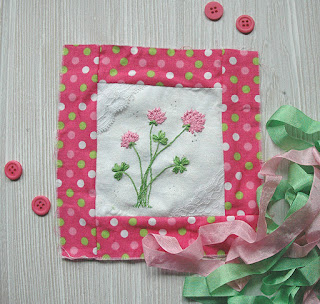
Finally this is March's embroidery. When March comes around I tend to think of St. Pat's Day so this clover seemed right for this month's freebie. I'm still filled with anxiety over what's happening in the world and I hope this embroidery helps you a bit with any stress you may be having by taking some time for yourself.

Something I didn't include in the first free embroidery was that I'm using a white pattern on white cotton fabric. I found that it's not the easiest fabric to trace a pattern on. A brighter day would have been better when I traced the pattern on a window. I just made a light box with some strip lights I bought 2 years ago to make a box for taking pictures but hadn't used. This is a LOT better than using a window. I always planned on buying a light pad but could never decide which to buy so this is a good way to make one with items I already had. I even had the piece of acrylic glass. I was going to cut out tatting shuttles, but again never got around to it.

Here are the directions for "March's" freebie. 

1. Cut a square of your background fabric 4 1/4" x 4 1/4". If you aren't adding borders like I did you should cut the fabric larger so it will fit in your embroidery hoop.

2. Using a permanent marker like a Pigma pen, trace the design.

3. Sew pieces of lace or fabric to the corners of the fabric following the pattern for placement.

4. Add the borders following the directions in the freebie posted in February.

5. Starting with the clover stems use 3 strands of floss (I used DMC 703) to stem stitch along each stem line.

6. For the clovers use the same thread as the stems but use all 6 strands of floss to make 2 lazy daisy stitches for each leaf.

7. Next I did the grass, though you can do it later. I used 3 strands of the same floss to do straight stitches (I used DMC 703). Make as much grass as you want.

8. The flowers are made with 4 strands of floss (I used DMC 604) to make the layers of lazy daisy stitches. Start at the bottom and work up.
-at the base of the flower use 4 strands of floss ( I used DMC 703) to make 2 lazy daisy stitches.

9. All the dots can be beads or french knots. I didn't do them yet since I plan on adding beads. I'll also be adding beads and french knots on the lace.

 Right click the pattern to save it to your hard drive. You'll need to print a pattern for tracing.


©Billie Jo Heisler 2022

All rights reserved

 Disclaimer:

I drew this design by hand then used a software program to edit it.

Please consider the drawing copyrighted. You have my permission to print copies of the drawing in any size for your own use but not to share or sell. If you want to share the pattern please link to the blog pages.

The embroidery design is my own. I have not knowingly copied anyone else's work.


Saturday, March 12, 2022

Second free embroidery finally


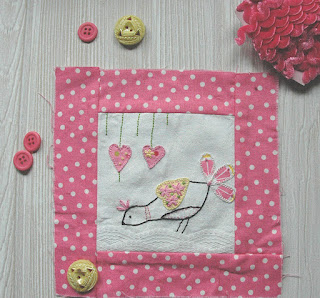
This is actually February's embroidery. I was all ready to put it up a week ago but the war in Ukraine happened and I just felt like it was too frivolous to even think about it. Now after reading how other artists are saying we need our art and crafts to help with dealing with all this emotional stress. I do hope it does help you a bit with any stress you may be having.

As someone who has dealt with anxiety and panic attacks since I was a small child I know how creating something can cause the mind to focus and forget about other things. Sometimes reading will help too, but right now for me, I find my mind tends to wander unless it's a book I'm really interested in. That's why more and more I'm turning to my art. I know I should be working on new patterns but I just can't make decisions when I'm stressed. I've been working on 3 new doll patterns since last year but I just can't make a decision about the clothing fabrics. At least when I'm following an art tutorial I just follow the directions, so much easier. Kinda like when you follow my patterns. :)

Something I didn't include in the first free embroidery was that I'm using a white pattern on white cotton fabric. I found that it's not the easiest fabric to trace a pattern on.

Here are the directions for "February's" freebie. 

1. Cut a square of your background fabric 4 1/4" x 4 1/4". If you aren't adding borders like I did you should cut the fabric larger so it will fit in your embroidery hoop.

2. Using a permanent marker like a Pigma pen, trace the design.

3. Sew a piece of lace or fabric to the bottom of the fabric. I sewed 2 layers of lace.

4. Add the borders following the directions in the freebie posted in February.

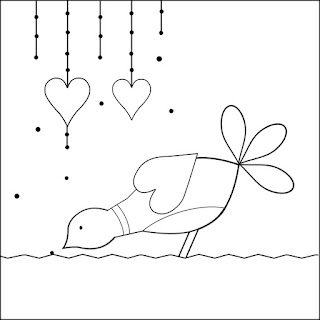
5. The hearts and tail can be appliqued like I did or just stitched with your favorite embroidery stitch.
-Trace the 3 hearts and the 3 tail pieces on Heat n Bond by Therm-o-web. This is a product that makes appliqueing small pieces so much easier. TIP: Don't hold the iron on for more than just a few seconds or you will also melt the other side.
-Once it cools peel off the paper.
-Lay the fabric pieces over the tracings and iron in place.
-Do a small blanket stitch with 2 strands of floss. For the 2 hanging hearts I used DMC 604, for the wing heart I used DMC 727, and for the tail I used DMC white.

6. The heart dangle lines are back stitched with 3 strands of floss ( I used DMC 704).
-Since the heart fabric didn't have much of a pattern I added 3 french knots on the left one (I used DMC 727, 3 strands) and a lazy daisy flower on the other ( I used DMC 727, 3 strands).
- the dots can be french knots or beads.

7. The bird's body is stem stitched with 2 strands of DMC 310 black.
- the legs are back stitched
- the beak is straight stitched
-the eye is a 3 wrap french knot or a bead
- inside the chest area make a running stitch with 2 strands of floss ( I used DMC 604)
- on the neck lines do a back stitch using 2 strands of floss (I used DMC 604)
- between the lines do a running stitch with 2 strands of floss (I used DMC 727)
- on the wings do a running stitch at the ends of the blanket stitch using 2 strands of floss (I used DMC 604).
- I used a solid fabric for the heart so I added some lazy daisy flowers and french knots. The 5 lazy daisys for each flower and the french knots are made with 4 strands of floss (I used DMC 604 and 704).
- the tail only has a few 3 wrap french knots using 3 strands of floss (I used DMC 604). Tip: add more flowers here if you used a solid fabric like I did for the heart wing.

8. All the dots can be beads or french knots. I didn't do them yet since I plan on adding beads. I'll also be adding beads and french knots on the lace.


 Right click the pattern to save it to your hard drive. You'll need to print a pattern for tracing.

 
©Billie Jo Heisler 2022
All rights reserved

 Disclaimer:
I drew this design by hand then used a software program to edit it.
Please consider the drawing copyrighted. You have my permission to print copies of the drawing in any size for your own use but not to share or sell. If you want to share the pattern please link to the blog pages.
The embroidery design is my own. I have not knowingly copied anyone else's work.

Sunday, February 27, 2022

First Free Embroidery of the Year-


YAY!!! I finally got one finished and here it is ------ Let's just say this is January's free embroidery even though it's February.

I know I'm really late but if you've read my past posts you know why but no matter because I'm finally ready to post the first embroidery freebie of the year. BTW, I hope you enjoyed the wrist pincushion pattern I posted at the beginning of the month.
I thought I'd go back to giving you some directions for the embroideries. You will need to know basic stitches and there are a LOT of youtube videos that can teach you any you don't.

1. Cut a square of your background fabric 4 1/4" x 4 1/4". If you aren't adding borders like I did you should cut the fabric larger so it will fit in your embroidery hoop.

2. Using a permant marker like a Pigma pen, trace the design.

3. Add the borders following these directions. Note that you will add these borders to all 12 of the designs. I plan on using a variety of matching fabrics, though I may end up changing this multi floral fabric for another. This is the way I'm adding fabric borders to all my embroidered squares this year. Use your fav quilt border if you don't want to use this one.

I cut the border strips from quilters quarters/fat quarters. I wanted the finished borders to be 1" wide so I added 1/2" for the seam allowances. I didn't cut the border into pieces, instead I sewed it to the square then cut it. Follow these directions and diagrams to make them like I do.
NOTE:I add the borders before I embroider but after I trace the design!

-- Cut a piece of fabric 1 1/2" wide. Match the edge to the TOP of the square and sew across.

Cut off the excess and press open.

-- Repeat for one of the sides. I go clock-wise.

-- Repeat for the bottom.

--Finish with the remaining side.
Make sure to press it and then check to make sure the borders are all even.

4. The petals can be appliqued like I did or just stitched with your favorite embroidery stitch.
-Trace 8 petals on Heat n Bond by Therm-o-web. This is a product that makes appliqueing small pieces so much easier. TIP: Don't hold the iron on for just a few seconds or you will also melt the other side.
-Once it cools peel off the paper.
-Lay the fabric petals over the tracings and iron in place.
-Do a small blanket stitch with 2 strands of floss ( I used DMC 603) around each petal.
-With 4 strands of the same floss do a chain stitch around the inner circle.
- For the "peeking" petals do a stem stitch and a long straight stitch with 3 strands of the same floss.

5. For the flower center use 3 strands of floss (I used DMC 727) to do a stem stitch next to the chain stitch.
- Fill in the circle with as many french knots as you like. I used 6 strands to make 2 wrap french knots.
- Repeat the knots at the tip of each long straight stitch in the small flower petals.

6. The outside line of the leaves is stem stitched with 3 strands of floss (I used DMC 703).
- The dots can be beads or 3 wrap french knots with the same floss.

7. The small series of lines in the corners are back stitched using 3 strands of the same flosses used for the flower.

8. The dots can be beads or french knots. I didn't do them yet since I plan on adding beads. I will probably add beads on the flower, too.

Here's the pattern for the embroidery:

 Right click the pattern to save it to your hard drive. You'll need to print a pattern for tracing.

 
©Billie Jo Heisler 2022
All rights reserved

 Disclaimer:
I drew this design by hand then used a software program to edit it.
Please consider the drawing copyrighted. You have my permission to print copies of the drawing in any size for your own use but not to share or sell. If you want to share the pattern please link to the blog pages.
The embroidery design is my own. I have not knowingly copied anyone else's work.